In an attempt to beat the winter blues this weekend C and I decided to make some decorative shutters to add a little more charm and a lot more curb appeal to our Home.
This is how we did it;
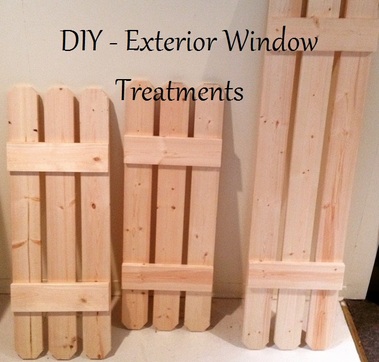
1) We used 1x4 lumber in 8ft lengths. We measured the height of the windows from the top of the window to just above the window ledge and cut the lumber to size. We did three vertical lengths of lumber for each shutter.
2) Lay the lengths out and use a shorter piece of 1x4 to lay across them horizontally. This will act as your "strapping". We decided to leave a 1 inch space between the lengths, so we measured the strapping to lay across the vertical lengths plus a space in the middle of them. Cut two matching lengths of the "strapping", one for the top and one for the bottom.
** Before we attached our horizontal pieces we cut each of the corners of the 1/4s at a 49 degree angle to give them a little more personality!
4) Attach the strapping by screwing the vertical lengths of wood to the strapping from the back side. This way there are no screw heads to be seen from the front!
5) Paint, stain or treat your shutters and let them dry really well before you install them!
6) You can attach the shutters to your home in a variety of ways. You could screw them directly on to your house or take a look at your local hardware store they will have different brackets you could use or there are specialty shutter brackets you can buy for a bit more money.
This project is relatively inexpensive, easy to do and my favourite part ... totally customizable! You can cut your shutters in shapes, use more lengths of wood for a wider shutter and paint or stain them in ANY colour!
I will post some more photos once we have them installed :)
This is how we did it;
1) We used 1x4 lumber in 8ft lengths. We measured the height of the windows from the top of the window to just above the window ledge and cut the lumber to size. We did three vertical lengths of lumber for each shutter.
2) Lay the lengths out and use a shorter piece of 1x4 to lay across them horizontally. This will act as your "strapping". We decided to leave a 1 inch space between the lengths, so we measured the strapping to lay across the vertical lengths plus a space in the middle of them. Cut two matching lengths of the "strapping", one for the top and one for the bottom.
** Before we attached our horizontal pieces we cut each of the corners of the 1/4s at a 49 degree angle to give them a little more personality!
4) Attach the strapping by screwing the vertical lengths of wood to the strapping from the back side. This way there are no screw heads to be seen from the front!
5) Paint, stain or treat your shutters and let them dry really well before you install them!
6) You can attach the shutters to your home in a variety of ways. You could screw them directly on to your house or take a look at your local hardware store they will have different brackets you could use or there are specialty shutter brackets you can buy for a bit more money.
This project is relatively inexpensive, easy to do and my favourite part ... totally customizable! You can cut your shutters in shapes, use more lengths of wood for a wider shutter and paint or stain them in ANY colour!
I will post some more photos once we have them installed :)
